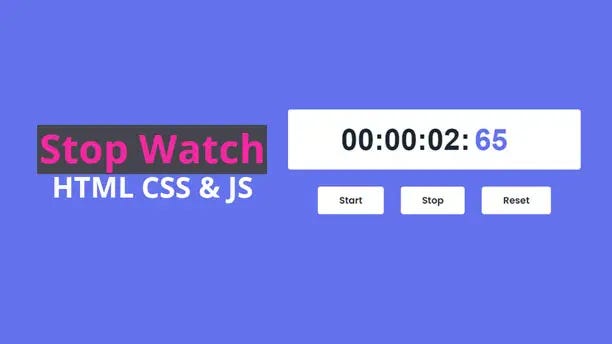
Hey everybody I hope you are all fine and I hope you are learning something new from my site. Today we will learn how to create a Stopwatch using HTML CSS and JavaScript.
Creating a stopwatch using HTML, CSS, and JavaScript is a great way to learn about web development and how these technologies can work together. In this tutorial, we’ll walk through the process of creating a simple stopwatch without providing the actual code. Instead, we’ll guide you through the key steps and concepts.

Before you start creating the stopwatch, make sure you have a code editor installed, such as Visual Studio Code, Sublime Text, or any other of your preference. You also need a web browser to test your stopwatch.
How to Create a Stopwatch Using HTML CSS and JavaScript
Before moving the codes, you can watch the tutorial to learn how to use HTML CSS, and JavaScript logic to create a stopwatch project from scratch. I hope you like the tutorial and you will get many ideas from it.
Hope you’ve watched the complete tutorial, let look at the source codes which used inside the project, you can check it below.
You May Also Like:
HTML Structure
Begin by creating the HTML structure for your stopwatch. You’ll need at least three elements:
Display: A div element to show the time.
Buttons: Start, stop, and reset buttons to control the stopwatch.
Script: Include a script tag to add your JavaScript code.
<!DOCTYPE html>
<html lang="en">
  <head>
    <meta charset="UTF-8" />
    <meta name="viewport" content="width=device-width, initial-scale=1.0" />
    <link rel="stylesheet" href="css/style.css" />
    <script defer src="js/script.js"></script>
    <title>Stop Watch Using HTML, CSS & JS</title>
  </head>
  <body>
    <div class="container">
      <div class="timmer">
        <p>00:00:00:</p>
        <span>00</span>
      </div>
      <div class="btns">
        <button class="btn" type="button" id="start">Start</button>
        <button class="btn" type="button" id="stop">Stop</button>
        <button class="btn" type="button" id="reset">Reset</button>
      </div>
    </div>
  </body>
</html>
Styling with CSS
Use CSS to style your stopwatch. You can choose fonts, colors, and layouts to make it visually appealing. Consider using CSS Flexbox or Grid for alignment and responsiveness.
@import url("https://fonts.googleapis.com/css2?family=Poppins:wght@400;500;600&family=Ruda:wght@400;600;700&display=swap");
* {
  padding: 0;
  margin: 0;
  box-sizing: border-box;
}
body {
  display: flex;
  align-items: center;
  justify-content: center;
  height: 100vh;
  font-family: "rudda", sans-serif;
  background-color: #6473ed;
}
.container {
  max-width: 550px;
  width: 100%;
}
.timmer {
  width: 100%;
  display: flex;
  align-items: center;
  justify-content: center;
  background-color: #fff;
  padding: 1.5rem;
  border-radius: 5px;
  box-sizing: 5px 5px 10px #1c2833;
  font-size: 2rem;
}
.timmer p,
.timmer span {
  font-size: 3.5rem;
  color: #1c2833;
  font-weight: 600;
}
.timmer span {
  color: #6473ed;
  width: 100px;
  margin-left: 0.5rem;
}
.btns {
  display: flex;
  align-items: center;
  justify-content: center;
  margin: 2rem;
}
.btn {
  margin: 0 1rem;
  padding: 0.8rem 2.5rem;
  outline: none;
  border: none;
  font-family: "poppins", sans-serif;
  font-size: 1.1rem;
  cursor: pointer;
  background-color: #fff;
  border-radius: 5px;
  color: #1c2833;
  font-weight: 600;
}
.btn:active {
  transform: scale(0.98);
}
Step 4: JavaScript Logic
This is where the core functionality happens. You’ll use JavaScript to keep track of time and respond to button clicks. Key steps include:
Variables: Declare variables to store the current time and the interval reference.
Event Listeners: Add event listeners to the start, stop, and reset buttons. These listeners will trigger functions when the buttons are clicked.
Start Function: When the “Start” button is clicked, start a timer using the setInterval function. Update the display to show the elapsed time.
Stop Function: When the “Stop” button is clicked, clear the interval clearInterval to stop the timer. You should also record the time when the stopwatch is stopped.
Reset Function: When the “Reset” button is clicked, reset the stopwatch. This involves clearing the interval, resetting the display to zero, and resetting any tracking variables.
Display Updates: Use JavaScript to format and display the elapsed time. You can use the Date object to calculate the time.
"use strict";
const btnsEl = document.querySelectorAll(".btn");
const timmerEl = document.querySelector(".timmer");
let hour = 0;
let minute = 0;
let seconds = 0;
let count = 0;
let timmer;
let html;
// btns events
btnsEl.forEach((btns) => {
  btns.addEventListener("click", () => {
    if (btns.id === "start") {
      // start btn
      timmer = true;
      stopWatch();
    } else if (btns.id === "stop") {
      // stop btn
      timmer = false;
      stopWatch();
    } else {
      // reset btn
      timmer = false;
      hour = 0;
      minute = 0;
      seconds = 0;
      count = 0;
      html = `  <p>00:00:00:</p>
                <span>00</span>`;
      timmerEl.innerHTML = html;
      stopWatch();
    }
  });
});
// stop watch
function stopWatch() {
  if (timmer) {
    count++;
    if (count == 100) {
      seconds++;
      count = 0;
    }
    if (seconds == 60) {
      minute++;
      seconds = 0;
    }
    if (minute == 60) {
      hour++;
      minute = 0;
      seconds = 0;
    }
    let hrString = hour;
    let minString = minute;
    let secString = seconds;
    let countString = count;
    if (hour < 10) {
      hrString = "0" + hrString;
    }
    if (minute < 10) {
      minString = "0" + minString;
    }
    if (seconds < 10) {
      secString = "0" + secString;
    }
    if (count < 10) {
      countString = "0" + countString;
    }
    html = ` <p>${hrString}:${minString}:${secString}:</p>
              <span>${countString}</span>`;
    timmerEl.innerHTML = html;
    setTimeout(stopWatch, 10);
  }
}
Test your stopwatch in different browsers and on various devices to ensure it works as expected. Debug any issues you encounter using your browser’s developer tools.
If you want to take your project to the next level, consider adding features like lap times, custom styling, or additional buttons for pausing and resuming. This will require you to expand your JavaScript logic and CSS styles.
Once your stopwatch is complete, you can deploy it to a web server or use GitHub Pages to share it with others.
Remember that creating a stopwatch is a great way to practice and improve your web development skills. While this tutorial doesn’t provide code, you can find many open-source examples and resources online that offer detailed implementations to help you build your stopwatch.
